
Coconut yoghurt is something that I find really easy to make, especially with the help of the Thermomix. You might think it seems difficult and not so easy from the number of steps below, but trust me it is worth while and a very cost effective way to make it. The yoghurt can be made on the stove top also for those of you that would like to make your own, but don’t have a Thermomix.
I found on the internet, Lesh’s Blog, The Mindful Foodie and love using her recipe, she shares how to make the stove top version too, click on the link to follow the recipe.
Eating fermented foods are a great source of natural probiotics and good for the health of your gut. Something that I am getting into more and more and learning that it is important to have a healthy gut for a healthy body and mind. Food is medicine!
To make my yoghurt, I bought a $4 coconut from Ron’s Veges. I turned it into coconut milk which, I then used for the coconut yoghurt and the fleshy pulp left over, I have turned into coconut flour to use in other recipes. What a versatile food source with not a lot of waste. I also know that there were no added nasties to my coconut milk, plus coconuts are a great source of essential saturated fats.

Coconut Milk
These are the steps I followed to extract the flesh with the help of the recipe from The Healthy Foodie:
- Punch the 3 holes into the top of the coconut, through the eyes of the coconut. I used a screw driver and a hammer while clamping the coconut in the vice. You see, the husbands shed can be useful for cooking too!
- Drain the coconut water into a cup to keep for making the coconut milk.

- Clamp the coconut into the vice and slowly do the vice up to crack open the coconut. I was lucky and a lot of the shell came away from the flesh. If this doesn’t happen, you get a butter knife and carefully with a bit of a flicking motion, remove the flesh from the shell.
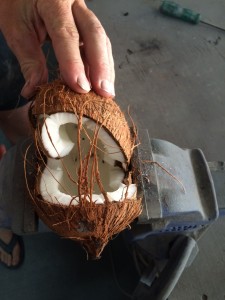
- I then peeled the brown skin from the white flesh by trimming it away with a sharp knife, as close as possible to not waste any of the white.

- I cut the flesh into small 2cm pieces and added the coconut water and an extra cup of rain water or filtered water into the Thermomix. Then blitzed on speed 10 for approximately 6 minutes.
- I poured another 1/2 cup to 1 cup of rain water or filtered water into the blended flesh, whizzed for another 10 seconds and strained the milk away from the flesh using a nut milk bag. The flesh and milk mixture were quite warm from being blitzed and I found I needed to wait for about 5 minutes before really being able to squeeze really hard as much of the liquid out as possible.
- Now you are ready to make coconut yoghurt.


Coconut Flour
- Turn on the oven to about 100 degrees.
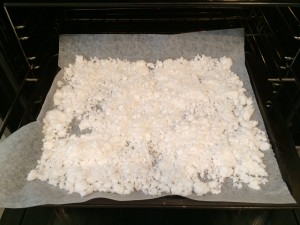
- Put a sheet of baking paper down on a baking tray and spread the coconut pulp out as flat as possible.
- Dry the pulp out in the oven for approximately 20 to 30 minutes. Until it turns a light brown colour.

- Blitz the dried out pulp for about 10 seconds on speed 9 in the Thermomix and store in an air tight jar or container for use in baking.


Coconut Yoghurt in the Thermomix
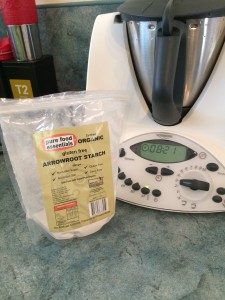
- Start out with the coconut milk you have just extracted, I had roughly 800g. If I haven’t made my own coconut milk, I use 3 x 400ml cans of TCC Premium Coconut Milk or the Ayam brand. Buy full fat only!
- Add from 2tbs to 1/4 cup of thickener of choice, depending on how thick you like your yoghurt. It can take a few goes to get this right. I’m still trying to get the consistency how I like it. This can change due to the thickener you use, the probiotics and the ambient temperature. I use an organic gluten free arrowroot starch that I found on eBay or you could buy some from Honest to Goodness. For this batch I added 2 and a 1/2 tablespoons to the coconut milk.
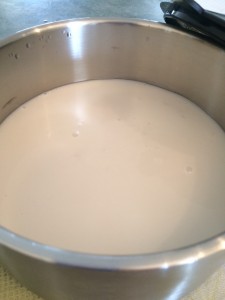
- In the Thermomix cook the coconut mix at 90C for 9 minutes on speed 3, this is to sterilise and cook the starch. Once this has finished you have about a 1.5 to 2 hour wait to cool the mix back to 37C.
- Time to sterilise the jars and glass mixing jug. It is during step 3 that I turn on my oven to approximately 60 degrees, boil the kettle and pour boiling water into the glass jars, the lids and the glass mixing jug. I let them sit for about 5 to 10 minutes before pouring out the boiling water and placing them in the low oven for about 10 minutes to dry. Pull them out of the oven to cool down once there is no more water left in the jars or mixing jug.
- Once the mix has reached 37C, stir in 1 tbs of maple syrup on speed 3 for 4 seconds. This is necessary to give the bacteria some sugars to eat for the fermentation process.
- Pour about 1/2 a cup of the coconut mix into the sterilised mixing jug. Add the culture. I use 2 x probiotic capsules that I pull apart, empty the contents into the coconut mix and gently stir in. Pour the cultured coconut mix back into the Thermomix. It needs to be mixed in, but first, I do step 7.

- Fill up your kettle again and boil the water to pour into your thermos to warm up prior to pouring in your yoghurt mix.
- Now that the culture coconut mix has been added back to the coconut mix in the Thermomix, it needs to be mixed in evenly and to the same temperature as the rest of the coconut mix. Cook for 3 minutes at 37C on speed 2.
- Empty the thermos of the boiling water, drain as much of the water out as possible and then pour the coconut yoghurt in, wrap the thermos with a few tea towels and place into an esky, in a warm spot that won’t be disturbed for 12 hours.

- Once the yoghurt has finished sitting for 12 hours, it smells and tastes sour with a slightly sweet coconut taste. The yoghurt is then ready to pour into the sterilised jars and to be refrigerated for 12 to 24 hours prior to eating. The refrigeration process does help with thickening the yoghurt also.


I hope you enjoy this coconut yoghurt as much as I do. At first I did find I needed to give myself sometime to adjust to the taste and texture. I had been accustomed to eating sweetened, processed dairy yoghurt for so long and the consistency of the coconut yoghurt is sometimes not exactly how I like it, but I have persisted and I do really enjoy this. I especially love it on my fruit for breakfast.

Go gal !
Sounds great… & yes , a bit of serious kitchen work ; )
Yes I agree; it does take some adjusting to the consistency & taste of coconut yoghurt. I think blueberries could improve the flavour….
Thanks!
I’ll give this a go over the holidays.
I hope it works well for you. Enjoy!